5. Issuing an invoice¶
Issuing an invoice is the central activity in eFakturaWin. This chapter describes all the elements of the "Invoice list", the entry form, invoice items and the printing and export options.
5.1. Where it opens¶
From the main menu:
- Invoicing → Invoice List — for viewing, editing, printing or deleting existing invoices.
- Invoicing → New Invoice — opens the entry form directly without going through the list first.
5.2. The "Invoice List" window¶
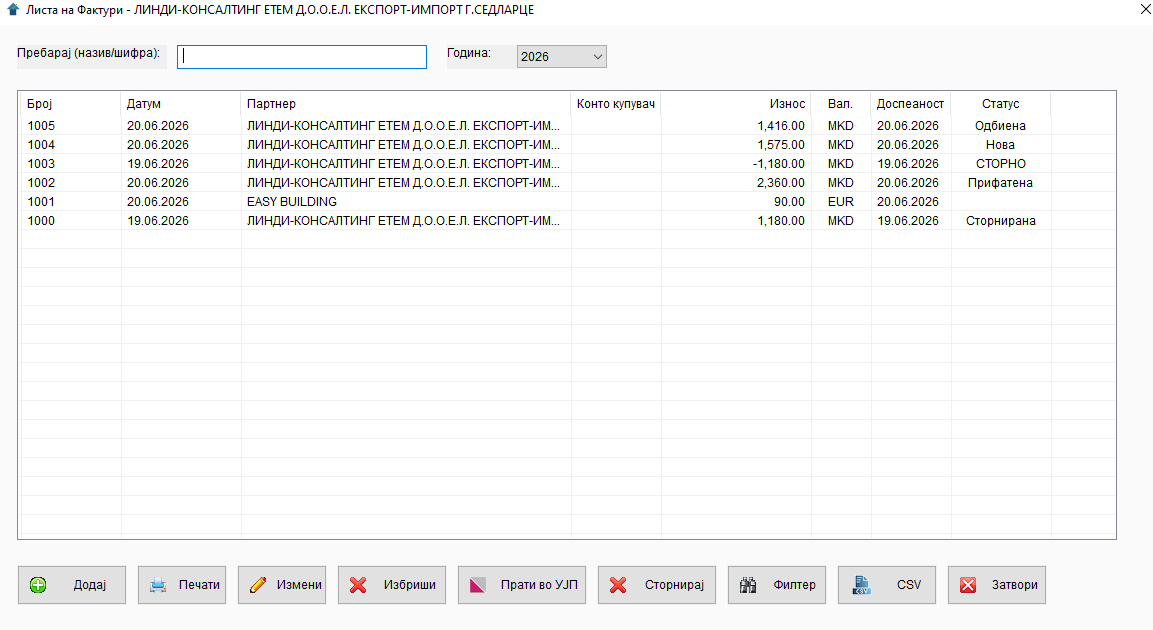
The window opens in a maximised size and shows all invoices for the active issuer.
Search field¶
Above the list there is a "Search" field. Type a partner name, account, a date in YYYYMMDD format or an invoice number — the list filters automatically as you type.
Year selector¶
To the right of the "Search" field there is a "Year:" drop-down. The invoice list is always limited to the chosen year — the current year is shown by default. When you choose another year, the list refreshes immediately.
The drop-down automatically includes every year in which invoices exist for the active issuer, plus the current year (even if it does not yet have any invoices). When you save an invoice in a year that was not yet in the list, the new year is added automatically.
Columns in the list¶
| # | Column | Description |
|---|---|---|
| 1 | (hidden) | Internal ID |
| 2 | Number |
Invoice number — an integer, the sequence starts at 1 for every year |
| 3 | Date |
Issue date |
| 4 | Partner |
Name of the buyer |
| 5 | Buyer account |
General ledger account |
| 6 | Amount |
Total amount (net + VAT) |
| 7 | Cur. |
Currency (MKD by default) |
| 8 | Due date |
Date by which the invoice should be paid |
| 9 | Status |
Blank for unsent invoices. "New" / "Accepted" / "Rejected" — status from the buyer after submission. "Voided" — when a void has been posted against this invoice that cancels it. "VOID" — for the void record itself (with negative amounts). See §5.7 and §10.4. |
Sorting
Click the header of any visible column to sort by it. Clicking the same header again reverses the direction (descending ↔ ascending). Clicking another header switches sorting to that field. By default the list is sorted by Number descending (newest first). The sort choice is remembered across the session — the next time you open the window, the list comes out with the same sorting.
Buttons below the list¶
| Button | What it does |
|---|---|
| Add | Creates a new invoice |
| Prints the selected invoice(s) to PDF | |
| Edit | Opens the selected invoice for editing (or double-click in the list) |
| Delete | Deletes the selected invoices |
| Send to UJP | Sends the selected invoice to e-Invoice — a JWS-signed POST /sales-invoice/send. After a successful response the EUID and the "Sent" status are displayed |
| Void | Cancels a previously sent invoice in UJP (§5.7) |
| Filter | Opens an advanced filter by date/partner/site/type/status |
| CSV | Exports the list to CSV format |
| Close | Closes the window |
Right click (context menu)¶
A right click on one or more selected rows gives you a short menu with:
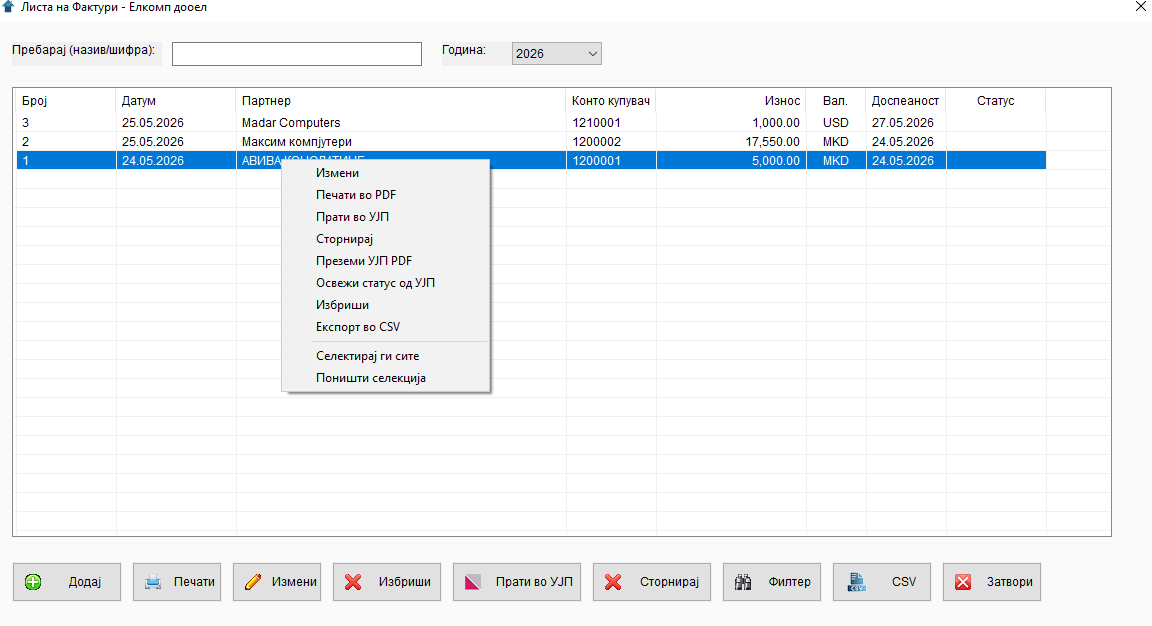
- Edit
- Print to PDF
- Send to UJP
- Void
- Download UJP PDF — official PDF from UJP with the QR code for verification
- Refresh status from UJP — pulls a new status (Accepted / Rejected / Voided) via
/changesfor the last 7 days - Delete
- Export to CSV (selected only)
- Select all
- Deselect all
Tip
For multi-selection, hold Ctrl while clicking rows, or hold Shift for a range selection.
5.3. Advanced filter¶
Press Filter to open a modal form with:
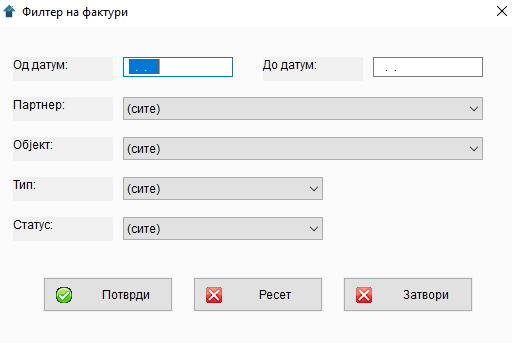
| Field | Description |
|---|---|
From date |
Start date of the interval |
To date |
End date |
Partner |
Drop-down with an "(all)" option |
Site |
Drop-down with an "(all)" option |
Type |
"(all)" / "Domestic" / "Export" — by the partner's country |
Status |
"(all)" / "Unsent" / "New" / "Accepted" / "Rejected" / "Voided" / "VOID" — matches exactly what is shown in the "Status" column of the list |
Exactly what each status means
- Unsent — the invoice has not yet been sent to UJP (or there is no response), it is not a void, and there is no other void that cancels it.
- New — sent to UJP, awaiting buyer acceptance (
buyer_status=01). - Accepted — the buyer has accepted it (
buyer_status=03). - Rejected — the buyer rejected it (
buyer_status=05). The reason and the comment are visible on the edit form — see §5.6 → UJP panel. - Voided — a void has been posted against this original invoice (a new invoice with
is_storno=1and a successful EUID; in the databasebuyer_status=07). - VOID — the void row itself (with negative amounts).
Buttons: - Confirm — applies the filter. - Reset — clears all criteria. - Close — closes without changes.
The filter "lives" throughout the session — if you close and reopen the window, the previous values are remembered.
5.4. Creating a new invoice¶
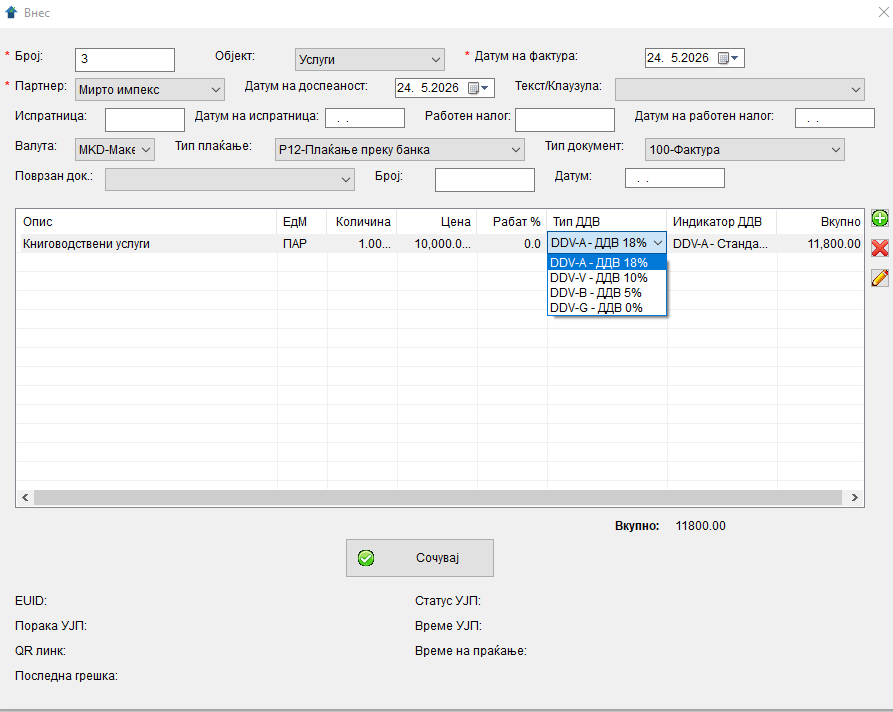
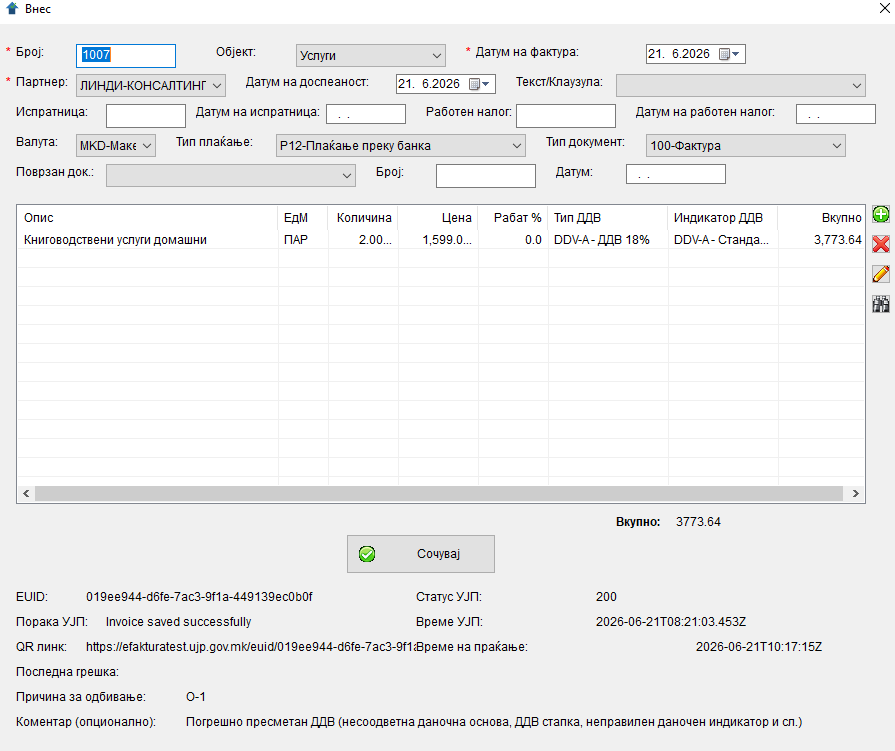
Clicking Add (or the menu Invoicing → New Invoice) opens an "Entry" window with two sections: header and items.
The look of the items grid depends on whether the active issuer is VAT-registered:
VAT-registered issuer — the grid has VAT Type and VAT Indicator columns, and the total amount under the grid shows net and VAT:
Non-VAT issuer — the VAT columns are hidden and the calculation is simple (Quantity × Price − Discount):
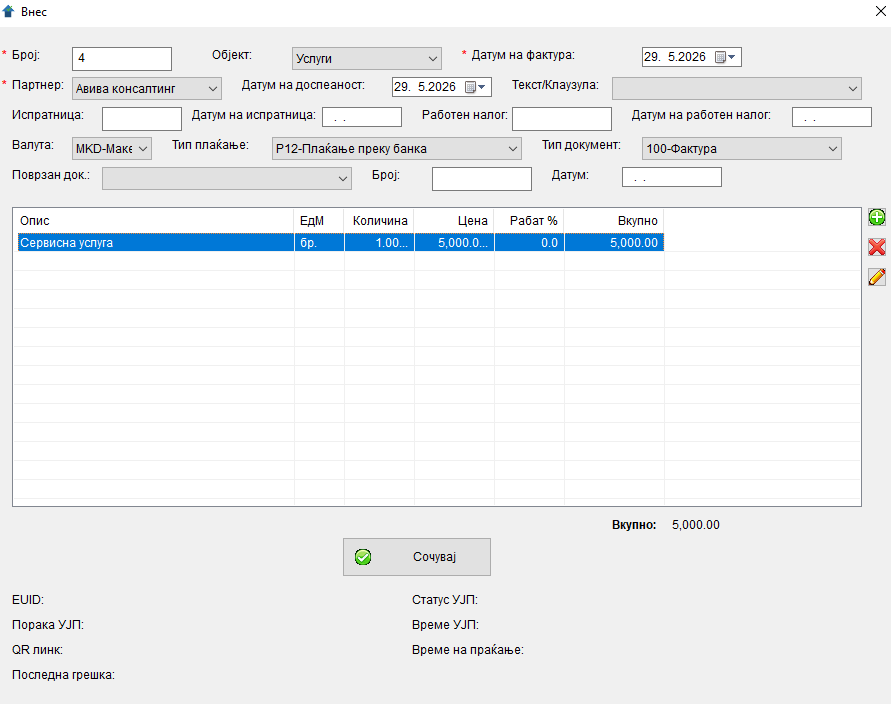
Header¶
| Field | Description | Required |
|---|---|---|
Number * |
An integer. By default the next free number for the active issuer and year is suggested (e.g. if the last invoice for 2026 is 47, 48 is suggested). You can accept the suggestion, change it or "skip" (e.g. from 5 to 10). It must not be 0 or negative; it cannot repeat within the same year. A duplicate is caught immediately — when you leave the field, if the number already exists for the active issuer in that year, the message "The entered invoice number already exists for this year…" appears at once, without waiting for Save. | ✅ yes |
Site |
The location from which the invoice is issued. The first site by default. | ✅ yes |
Invoice date * |
Today's date by default. If the list has a year other than the current one selected (e.g. you are viewing 2027 while you are in 2026), 1 January of that year is the default. | ✅ yes |
Partner * |
Buyer — choose from a drop-down. If the partner does not exist, first add them via Codebooks → Partners. | ✅ yes |
Due date |
By when the buyer should pay. Same as the invoice date by default. Must not be earlier than the invoice date (the same day is allowed — for invoices due "immediately"). | no |
Text/Clause |
Choose a clause from a drop-down (or blank). | no |
Delivery note |
Delivery note number (if the invoice follows a delivery note). | no |
Delivery note date |
Delivery note date. | no |
Work order |
Work order number (if the invoice follows a work order). | no |
Work order date |
Work order date. | no |
Currency |
Currency code (MKD by default, EUR, USD etc.). | no |
Payment type |
Payment type per the UJP codebook: P10 cash, P12 bank, etc. | no |
Document type |
"100" for a standard invoice. | no |
Related doc. |
Type of related document (NAR — order, FIS — fiscal receipt, SYS — related e-invoice etc.). | no |
Number / Date (of related doc.) |
Identifiers if you chose a type. | no |
Details of these codebooks (currency, payment type, document type, related-document type): Appendix A.
Invoice items¶
Items are entered in a grid (table) below the header. Each row is one line of the invoice.
| Column | Description |
|---|---|
Description |
Description of the goods or service |
UoM |
Unit of measure (e.g. "pcs", "kg", "h") |
Quantity |
Numeric value, up to 4 decimals |
Price |
Unit price without VAT, up to 4 decimals |
Discount % |
Discount in percent |
VAT Type |
Code from the UJP codebook (DDV-A = 18%, DDV-B = 5%, DDV-V = 10%, DDV-G = 0%) |
VAT Indicator |
Code from the UJP codebook (standard VAT, exempt, reverse charge, etc.) |
Total |
Automatically calculated sum Quantity × Price × (1 − Discount/100) × (1 + VAT/100) (read-only) |
Details for VAT Type and VAT Indicator: Appendix A.3 and Appendix A.4.
Adding and deleting items¶
To the right of the grid, stacked one below the other, there are four small icon buttons (top to bottom): Add item (green plus), Delete items (red X), Open the multi-line editor for the selected item's description (pencil) and Fill description, UoM, price and VAT codes from the article codebook (magnifier — see the next subsection). The active action is revealed by the tooltip when you hover over the icon.
- Clicking Add item appends a new empty row at the end of the grid.
- Clicking Delete items deletes the selected row (or several selected with
Ctrl/Shift). A confirmation message appears before deletion. - 💡 Long descriptions: the grid shows the description in a single field. For a long, multi-line description, select the row and click the pencil icon. An "Edit item description" window opens with a text field in which you can freely enter multiple lines.
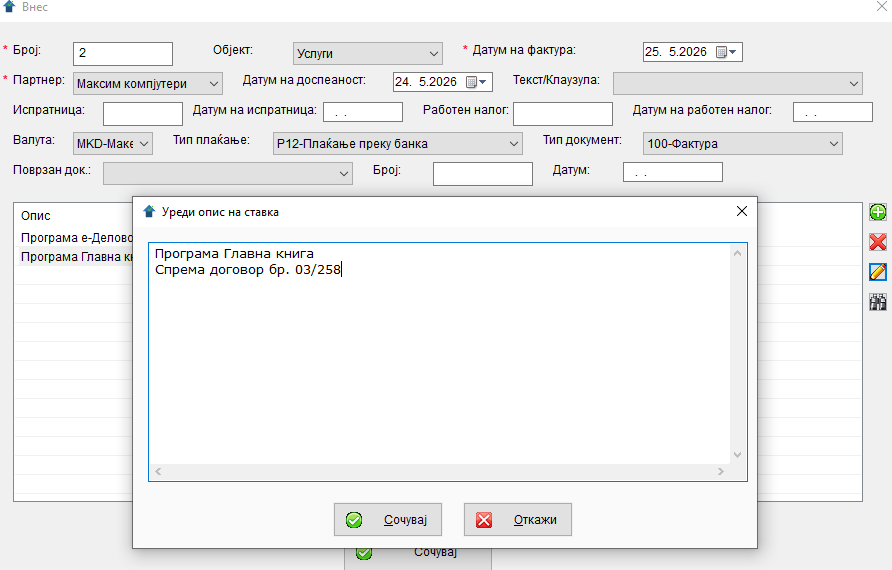
Picking from the article codebook¶
To the right of the grid, below the description-edit button, there is a magnifier button 🔍 — "Fill description, UoM, price and VAT codes from the article codebook". The picker saves you time if you often invoice the same products or services — it brings in the default price and VAT codes from the article codebook (§4.4).
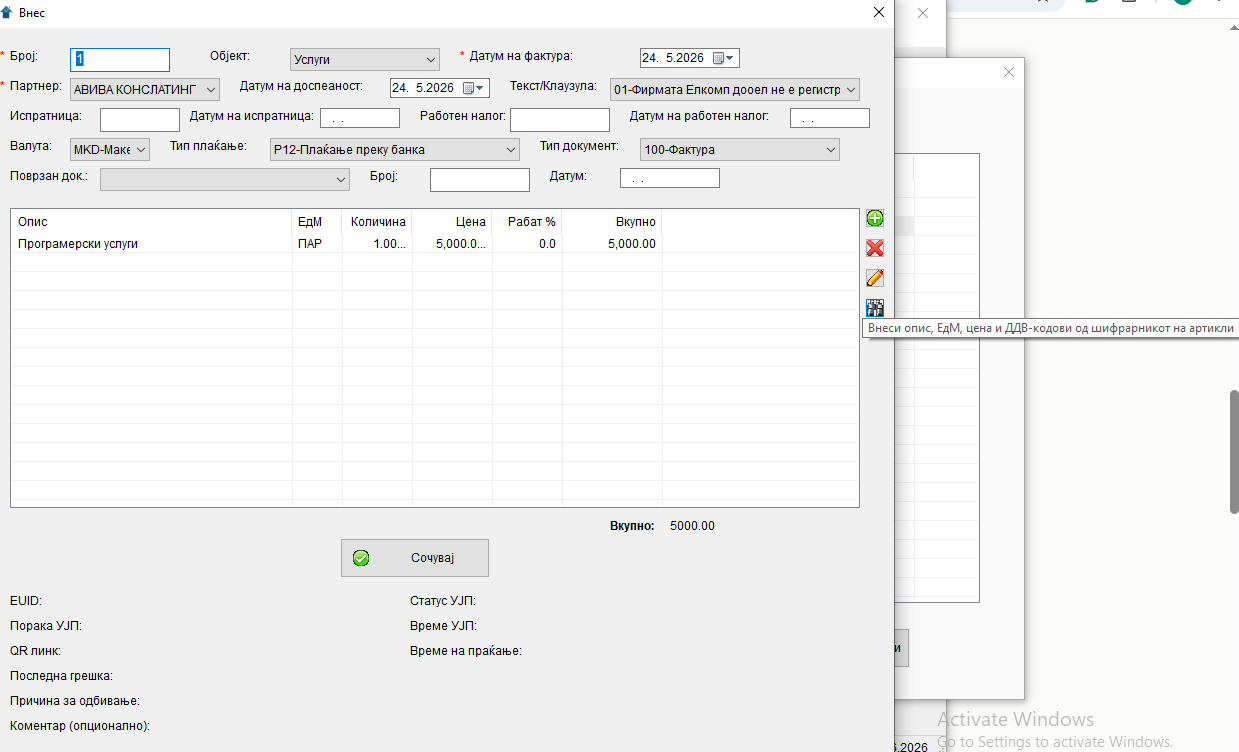
Procedure:
- Select a row in the items grid (or press + for a new one).
- Click 🔍.
- In the "Pick article" window, search by code or name:
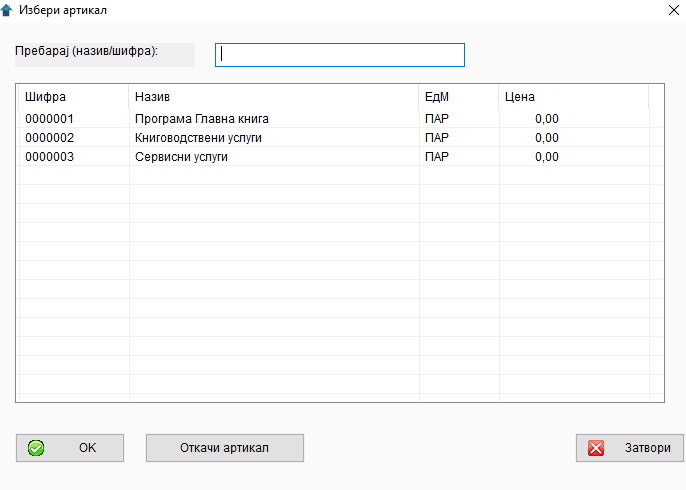
- Double-click the match (or OK) — the description, UoM, price, VAT type and VAT indicator are copied into the row; the total is computed automatically.
- The quantity and discount remain unchanged — those are per-invoice decisions, not attributes of the article.
After the picker fills in, all cells remain editable — you can adjust the price for this specific invoice without affecting the codebook.
Unlink without clearing
The "Unlink article" button in the picker breaks the link between the row and the codebook record — but the fields stay populated. That way you can use the article as a template and then edit the description for this invoice, without leaving a link to the original codebook record.
For non-VAT issuers
When the active issuer is not VAT-registered, the picker does not overwrite the VAT Type and VAT Indicator columns — they stay at 0% (DDV-G). That way the invoice always comes out without VAT, regardless of which default VAT codes you have stored on the article.
The picked article's code is kept invisibly on the row and goes into the database (stavkfu.artikal_code), so that you can later produce "sales by article" reports via the CSV export.
Total calculation¶
- The "Total" column in the grid is updated automatically when you change quantity, price, discount or VAT type.
- At the bottom of the window, below the grid, "Total: …" is shown — the sum of all rows.
Saving¶
Press Save. The system checks:
- ✅ The invoice number is a positive integer (> 0).
- ✅ The number is not already taken by another invoice for the same issuer in the same year.
- ✅ The invoice date is entered.
- ✅ The due date is not earlier than the invoice date.
- ✅ The partner is selected.
- ✅ There is at least one item.
If anything is missing, the message "Enter…!", "Select a partner!", "The entered invoice number already exists for this year…" or "Due date must not be earlier than the invoice date" appears — and the cursor jumps to the relevant field.
On a successful save, "The invoice was saved successfully!" appears and the window closes. The list is refreshed.
Transaction safety
If something goes wrong while writing to the database (e.g. the disk is full), all changes are rolled back automatically. The old invoice row remains unchanged; no "half" invoices are left behind.
UJP panel (below Save)¶
Below the "Save" button there is a section with read-only fields:
| Field | Description |
|---|---|
EUID |
Unique identifier of the invoice in UJP |
UJP status |
HTTP response status |
UJP message |
Response text |
UJP timestamp |
ISO timestamp |
QR link |
URL for the QR code for invoice verification |
Sent at |
Local send time |
Last error |
Last failure (if any) |
Rejection reason |
When the buyer has rejected the invoice — a combined display O-3 — Wrong buyer data (code + text as returned by UJP). Blank for invoices that have not been rejected. |
Comment |
The free-form text the buyer may have written along with the rejection. Blank for invoices that have not been rejected or where the buyer did not enter a comment. |
These fields are populated automatically when you click Send to UJP (for EUID/Status/Message/QR/time) or when you refresh statuses from UJP via right click → Refresh status from UJP or Service → Status of sent invoices (for Rejection reason / Comment). For details of the integration itself, refreshing and rejection codes: chapter 10 — UJP integration.
5.5. Printing to PDF¶
Select one or more invoices in the list and press Print (or right click → "Print to PDF").
eFakturaWin generates a PDF for each selected invoice in the same folder as the application, with the name:
Faktura_<number>.pdf— for domestic invoices (partner in MK)Invoice_Export_<number>.pdf— for export invoices (partner outside MK), with English labels and IBAN/SWIFT instead of the giro account
The PDF opens automatically in the default Windows PDF viewer.
PDF details: chapter 7 — PDF printing.
5.6. CSV export¶
Both the CSV button below the list and the Right click → Export to CSV option work identically — they export only the selected rows, in the order in which they are shown by the current sorting. If you want to export several invoices in a single operation, first select them with Ctrl+click or Shift+click (or Select all from the context menu).
The CSV output format:
For outbound invoices the amount goes into the Debit column (the buyer owes), and the Credit column is 0. For inbound invoices the layout is reversed (the amount in Credit, 0 in Debit); see chapter 9 — Inbound invoices.
Details: chapter 8 — CSV export.
5.7. Voiding a sent invoice¶
When an invoice has already been sent to UJP (it has an EUID and a QR link) and needs to be cancelled — e.g. wrong buyer, wrong rate, duplicate — a void is used. A void is a separate invoice with negative amounts that UJP accepts and that automatically marks the original as voided.
When to void¶
| Situation | What to do |
|---|---|
| The invoice has been sent but contains an error | Void it and issue a new one |
| The invoice has NOT been sent (no EUID) | Simply edit or delete it via Edit / Delete — no void needed |
| The invoice has already been voided | Cannot be voided again; if needed, issue a new one |
How to void¶
- In "Invoice List" select the invoice to void.
- Click "Void" on the toolbar (or right click → "Void").
- A confirmation appears: "Are you sure you want to void this invoice?" — click "Yes".
- The "Void outbound invoice" window opens with the original's EUID in the title:
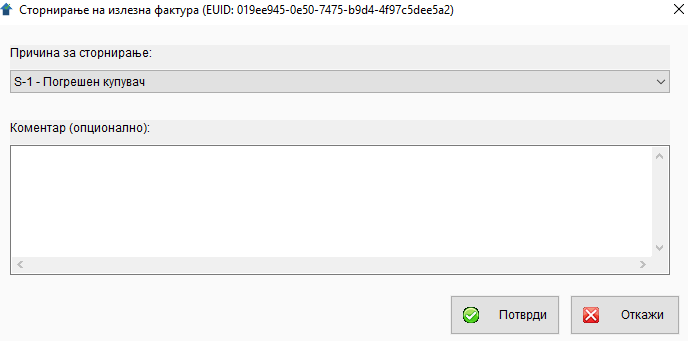
| Field | Description |
|---|---|
Void reason * |
Drop-down with predefined codes from UJP (cb_void_reason): S-1 Wrong buyer, S-2 Contract cancellation, S-3 Goods returned in full, S-4 Double invoicing of the same supply, S-5 Other |
Comment |
Free-form text (optional). Recommended for S-5 (Other). |
- Click "Confirm". The application:
- Creates a new invoice with the next free number (BR_FAK + 1), the same items, and an internal reference to the original.
- Sends it to UJP immediately.
- On success the message "The invoice was successfully voided in UJP." appears with the new EUID.
How a void is identified in the list¶
The "Status" column automatically marks void records:
| Status | Meaning |
|---|---|
| (blank) | Regular invoice |
| Voided | Original that has been cancelled by some void record |
| VOID | The void record — has negative amounts (−100.00 MKD etc.) and an EUID obtained after the void operation |
Both the original and the void record remain in the list — history is not deleted, only marked.
Validations¶
The application rejects invalid void attempts with a clear message:
| Attempt | Message |
|---|---|
| Voiding an invoice that has not yet been sent to UJP | "Voiding requires a successfully submitted invoice (with EUID)." |
| Voiding an invoice that already has a void posted against it | "This invoice has already been voided. It cannot be voided twice." |
| Trying to void the void record itself | "A void invoice cannot itself be voided." |
A void is final
Once a void has been sent, it cannot be undone. UJP treats void records as final. If you want to reinstate the invoice after voiding, you must issue a new one with new items and a new number.
Do not change the issuer profile between submission and void
UJP has cached the original invoice byte for byte at submission time, and on void it validates that every field in the void document matches the cached one. If you change the issuer data (name, address, giro account, IBAN, SWIFT, signatory, VAT status) in Codebooks → My Company Profile after sending the invoice, voiding that invoice will be rejected with an error of the form:
"docPayment don't match: DocPaymentNote are different original=… send=…" (or a similar mismatch for another field).
The same applies to the partner (buyer) data in Codebooks → Partners — if you change it after sending, the void will be rejected.
How to avoid it:
- Do not change the issuer profile or the partner data after sending to UJP. Enter all banking details (giro account, IBAN, SWIFT) once, up front.
- If you must change something, first void all affected sent invoices in which the issuer/partner participate, and only then change the profile.
- If you have already made a change and the void will not go through: revert the changed field to its old value, perform the void, and then change the profile again.
If UJP rejects the void operation, the local void row is removed automatically — no EUID-less record will be left in the list, and you can try again after fixing the root cause.
5.8. Editing an invoice¶
A double click on a row in the list, or the Edit button / right click → Edit. The same form as for a new invoice opens, but populated.
Saving is identical — the old items are deleted and rewritten with the new values. EUID and the UJP fields remain unchanged.
Warning
If you have already sent the invoice to UJP and then edit it — the change stays local and is not reflected in UJP. To correct sent invoices in UJP, you must send a "void" document.
5.9. Deleting an invoice¶
Select one or more rows and press Delete. A confirmation message appears: "Are you sure you want to delete all selected rows?".
On confirmation, the invoice and all its items are deleted in a single transaction. If something fails, nothing is changed (rollback).
Deletion is final
There is no recycle bin. If you have deleted an invoice by mistake, the only solution is a backup of eFakturaWin.db from a time before the deletion.
5.10. Tips and standard work procedure¶
- 💡 Numbering: the invoice number is an integer, with a separate sequence for each calendar year. The application automatically suggests the next free number (
MAX + 1), but you can change it or "skip" (e.g. from 5 to 10) — as long as the number is positive and unique within that year. On 1 January each year the numbering naturally starts from 1. - 💡 Partner before invoice: if it is a new partner, first add them in Codebooks → Partners. You cannot enter a partner directly from the invoice form.
- 💡 Double check: before the final save, check the items — especially quantities and prices, because VAT is automatically calculated from them.
- ⚠️ Do not edit invoices after sending to UJP (once the feature is active). Errors are corrected by issuing a new void document.
- ⚠️ Do not change the issuer profile or partners after sending. UJP validates every field of the void document against the cached original; any change to banking/address data after the first send will block the void of those invoices. See §5.7.
- 💡 Backups — we recommend a copy of
eFakturaWin.dbevery evening or after entering >5 new invoices.
← Back to contents | Previous: Clauses ← | Next: Pro-forma invoices →