2. Sign-in and passwords
This chapter describes how to work with users and passwords in eFakturaWin: initial setup, day-to-day sign-in, password change and what to do if you forget your password.
2.1. How users work
Every work session in eFakturaWin has two independent concepts:
- Issuer (company) — the company whose invoices you are issuing. A single installation can have multiple issuers (e.g. if you are an accountant with several clients). The sign-in window always requires you to choose an issuer.
- User — the person working in the application. By default, there is a single user
ADMIN. Users are not tied to a specific issuer — any user can sign in under any issuer.
In the current version
One user can work under any issuer without separate rights. Splitting rights (e.g. "User X can only read, not delete") is planned for a future version.
2.2. Sign-in window
Each time the application is opened, a "Sign in to the system" window appears with three fields:
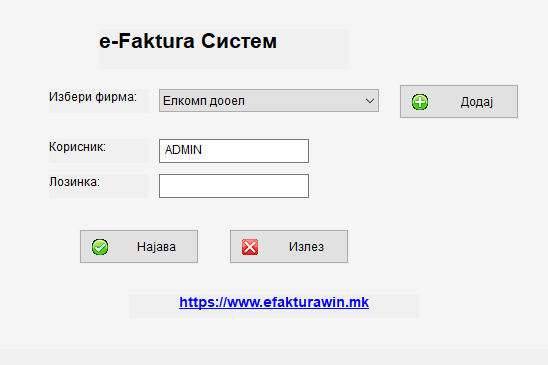
| Field | Description |
|---|---|
Select company |
Drop-down list of all registered issuers. Choose the one you will be working with for this session. |
User |
User code (e.g. ADMIN). Written in uppercase. |
Password |
The user's password. Masked with asterisks. |
Below the fields there are three buttons:
- Sign in — confirm and enter the application.
- Exit — close the application without signing in.
- Add — opens the form for entering a new company (issuer), useful if you need to add a second client before signing in.
Quick sign-in
Press Enter in the user field to move to the password field, then Enter in the password field to activate the "Sign in" button.
2.3. First password setup
The default user ADMIN is created without a password. On first sign-in, you have two options:
Option A — work without a password
Leave the Password field blank and press Sign in. A message will appear:
An empty password was saved. Leave the field blank on subsequent sign-ins.
With that, you have chosen the no-password mode. On every future opening, the Password field must remain blank for sign-in to succeed.
Tip
This mode is most practical for a single computer used by only one person.
Option B — set a password
In the Password field, enter a password of your choice (you can enter even a single letter — there is no minimum) and press Sign in. A message will appear:
Password set successfully. You will use it on subsequent sign-ins.
From this moment on, you will need exactly that password to sign in.
Choose carefully on first sign-in
Whatever you enter in the password field the first time becomes your password.
2.4. Day-to-day sign-in
After the first setup, every subsequent opening requires:
- Selection of an issuer.
- Entry of a user (
ADMINis auto-filled by default). - Entry of the correct password (or blank, if you chose the no-password mode).
- Click Sign in.
On an incorrect password, "Wrong password." appears and you can try again. There is no limit on the number of attempts.
2.5. Changing the password
Once signed in, you can change the password at any time:
- From the main menu choose Service → Change password.
- A "Change password" window opens with three fields:
- Old password — enter the current password (blank if you are in no-password mode).
- New password — the password you want to use from now on. Blank is allowed and means "switch to no-password mode".
- Confirm new password — enter the new password again to rule out typos.
- Press Save.
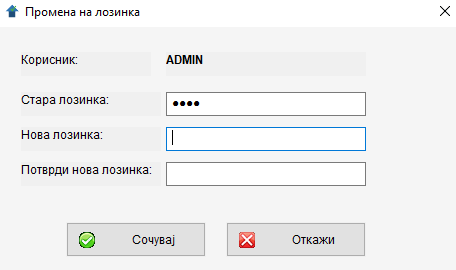
The system will verify the old password; if it is correct, the new one is saved. A message appears:
Password changed successfully.
or, if you chose an empty new password:
An empty password was saved. Leave the field blank on subsequent sign-ins.
Possible errors: - "Wrong password." — the old password does not match the stored one. - "The new password and the confirmation do not match." — the third field does not match the second.
2.6. Re-signing in within the same session
Sometimes you will want to switch to another issuer without closing the application (for example, if you are an accountant working for two companies in turn):
- From the main menu choose Service → Sign in again.
- The sign-in window opens again.
- Choose the new issuer and confirm.
The active issuer in the status bar at the bottom of the main window always shows the current company.
2.7. Forgotten password
eFakturaWin has no automatic password reset
There is no recovery e-mail, no "security questions". This is a deliberate choice for an application that runs entirely locally (without a server).
If you forget your password:
- Backup. If you have a recent backup of
eFakturaWin.dbfrom a period when the password was known, simply restore it. - Manual reset via a SQLite tool. As a last resort:
- Close eFakturaWin.
- Open
eFakturaWin.dbwith DB Browser for SQLite (a free tool) or similar. - In the
usertable, on the row of the relevant user, clear the values in thepassword_hashandsaltcolumns (make them empty, NULL). - Save and close.
- Start eFakturaWin. The user will now be in "no password" state and the first sign-in will be a setup one again.
Tip
If you are not sure how to do this or do not have a SQLite tool, contact us — we can help via remote access.
2.8. Security in brief
- Passwords are stored hashed. They are never stored in readable form in the database. We use SHA-256 with a unique salt for each user.
- The
eFakturaWin.dbdatabase is local. No external server sees it. - All invoices, partners and settings are local. They are not uploaded to the internet except for UJP integration (under development).
This means that physical access to the computer = access to the data. If you work on a shared computer, set a password. If the computer is only yours and locked with a Windows password, the no-password mode in eFakturaWin is reasonable.
← Back to contents | Previous: Installation and first run ← | Next: Issuer profile →